How To Set A Light Timer Switch: Your Simple Guide To Automated Home Lighting Today
Imagine coming home to a softly lit house every evening, or having your outdoor lights come on just as dusk settles, all without lifting a finger. That kind of easy living is a real possibility with a light timer switch, and frankly, it's pretty neat. Many folks are looking for ways to make their homes a bit smarter, a bit safer, and maybe even save a little on energy bills, and this handy gadget does all that.
Setting up one of these automatic light switches might seem a bit tricky at first glance, like trying to figure out a new puzzle, but it's often much simpler than you think. You might have seen these devices, sometimes called a switching timer or an automatic light switch with a timer, and wondered how they work. Well, they help you put your lights on a schedule, which is quite useful for lots of reasons.
This guide will walk you through the steps to set a light timer switch, no matter if it is for indoor lights, or if you are looking to set up a timer switch for outdoor lights. We will cover different kinds of timers and give you practical advice. So, you know, get ready to gain control over your home's lighting in a simple way.
Table of Contents
- Understanding Light Timer Switches
- Why Use a Light Timer Switch?
- Getting Ready to Set Your Timer
- Step-by-Step: How to Set a Light Timer Switch (General Guide)
- Tips for Specific Situations
- Common Questions About Timer Switches
- Troubleshooting Your Light Timer Switch
Understanding Light Timer Switches
What a Timer Switch Does
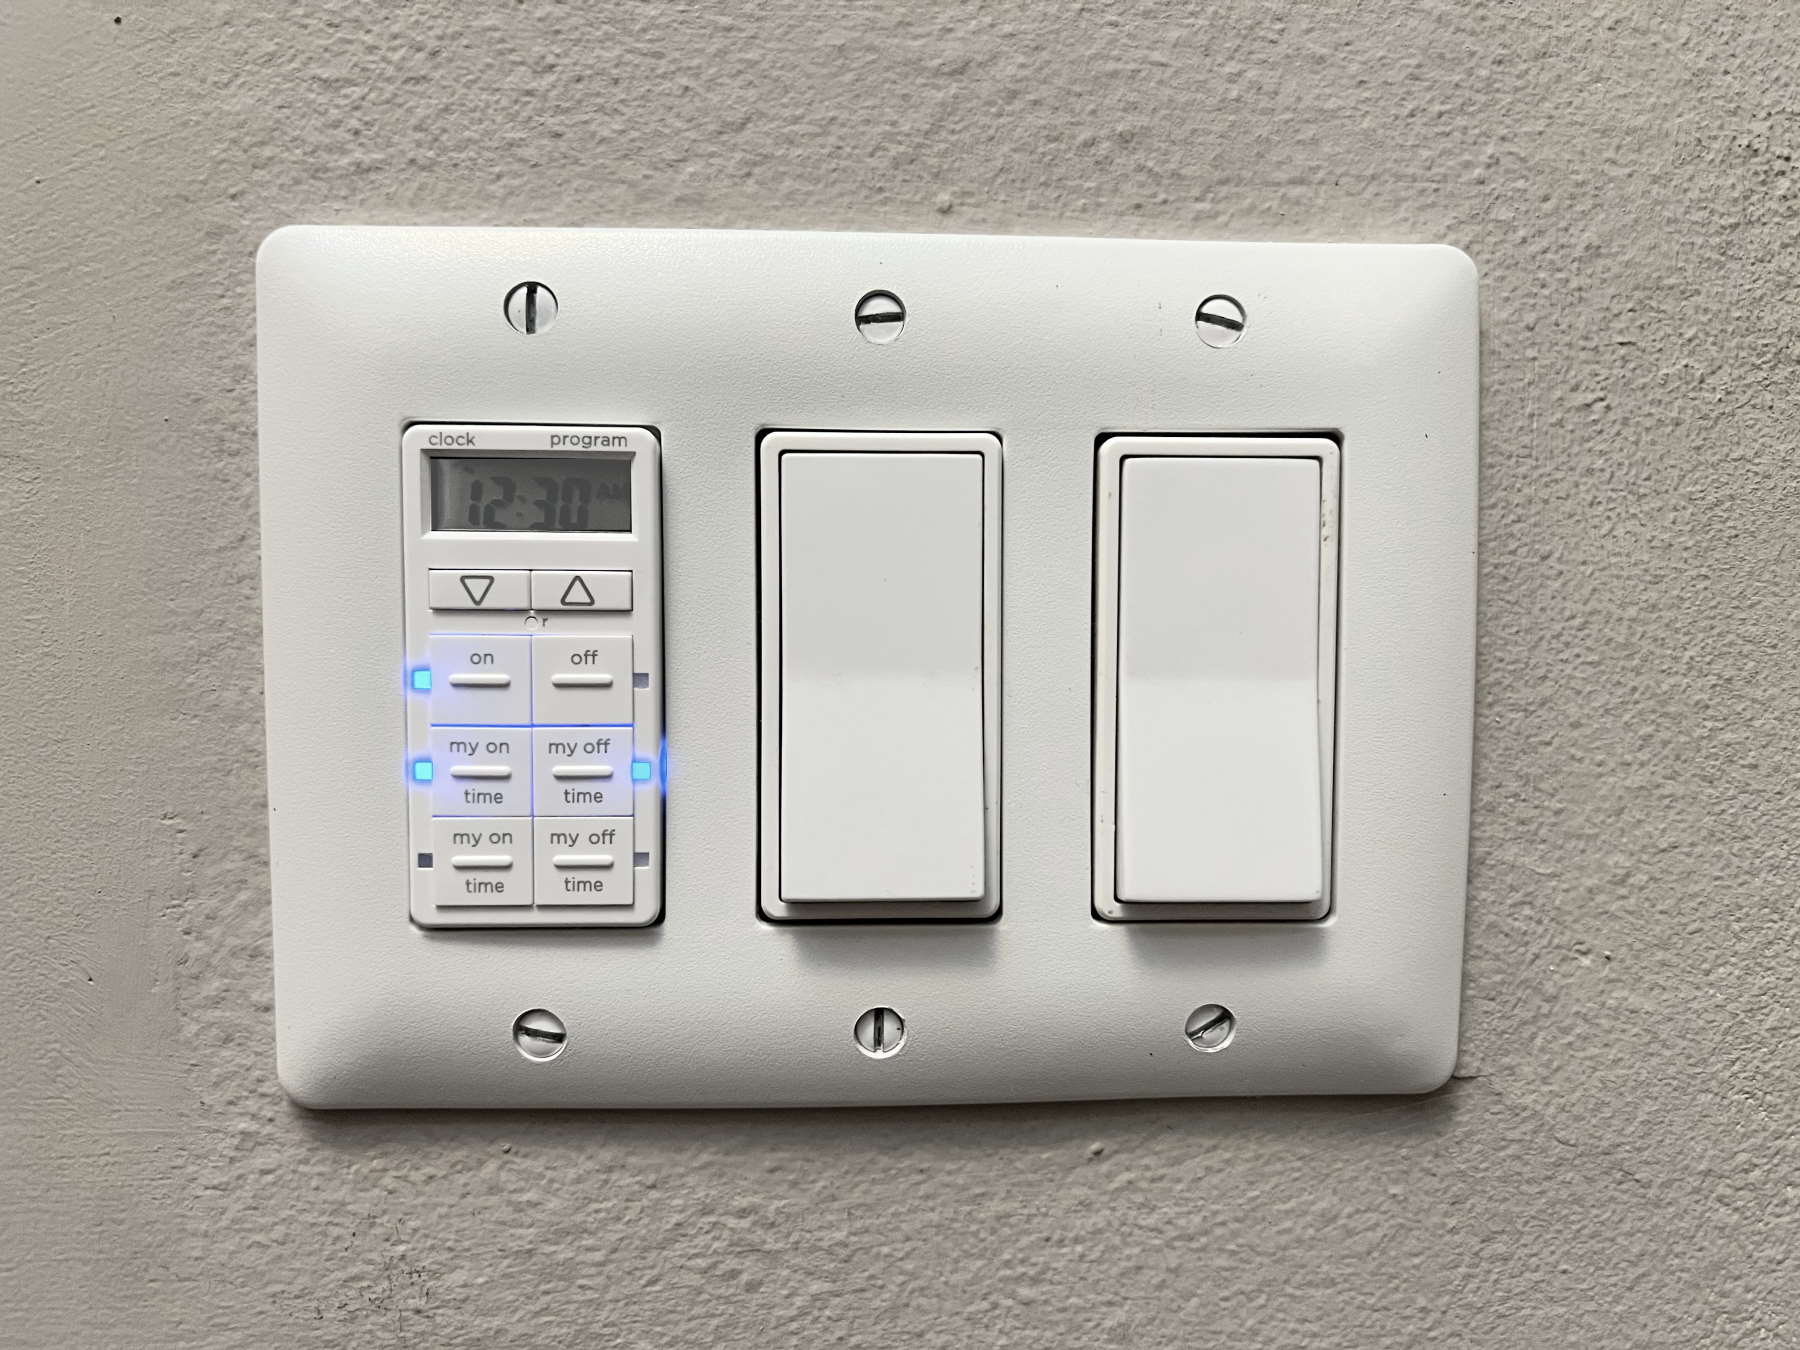
A light timer switch, at its core, is a device that helps you control when your lights turn on and off automatically. It is a bit like setting an alarm clock for your lights, really. You tell it a specific time, and it makes sure the light responds. This means your lights can operate without you being there, which is pretty handy. The objects in a set, like the elements in a mathematical set, are the times you choose for the light to activate or deactivate. Each chosen time is a distinct element in the light's schedule.
These devices replace your regular light switch. They let you program a schedule for your lights. This means you can have your porch light come on at sunset and turn off at sunrise. Or, your living room lamp can turn on right before you get home from work. It's about putting your lights in a particular place in time, so to speak.
Types of Timer Switches
There are a few main types of light timer switches you might come across, and each has its own way of being set. Knowing the type you have, or the type you want, makes the setup process much smoother. You know, some are simpler, and some offer more options.
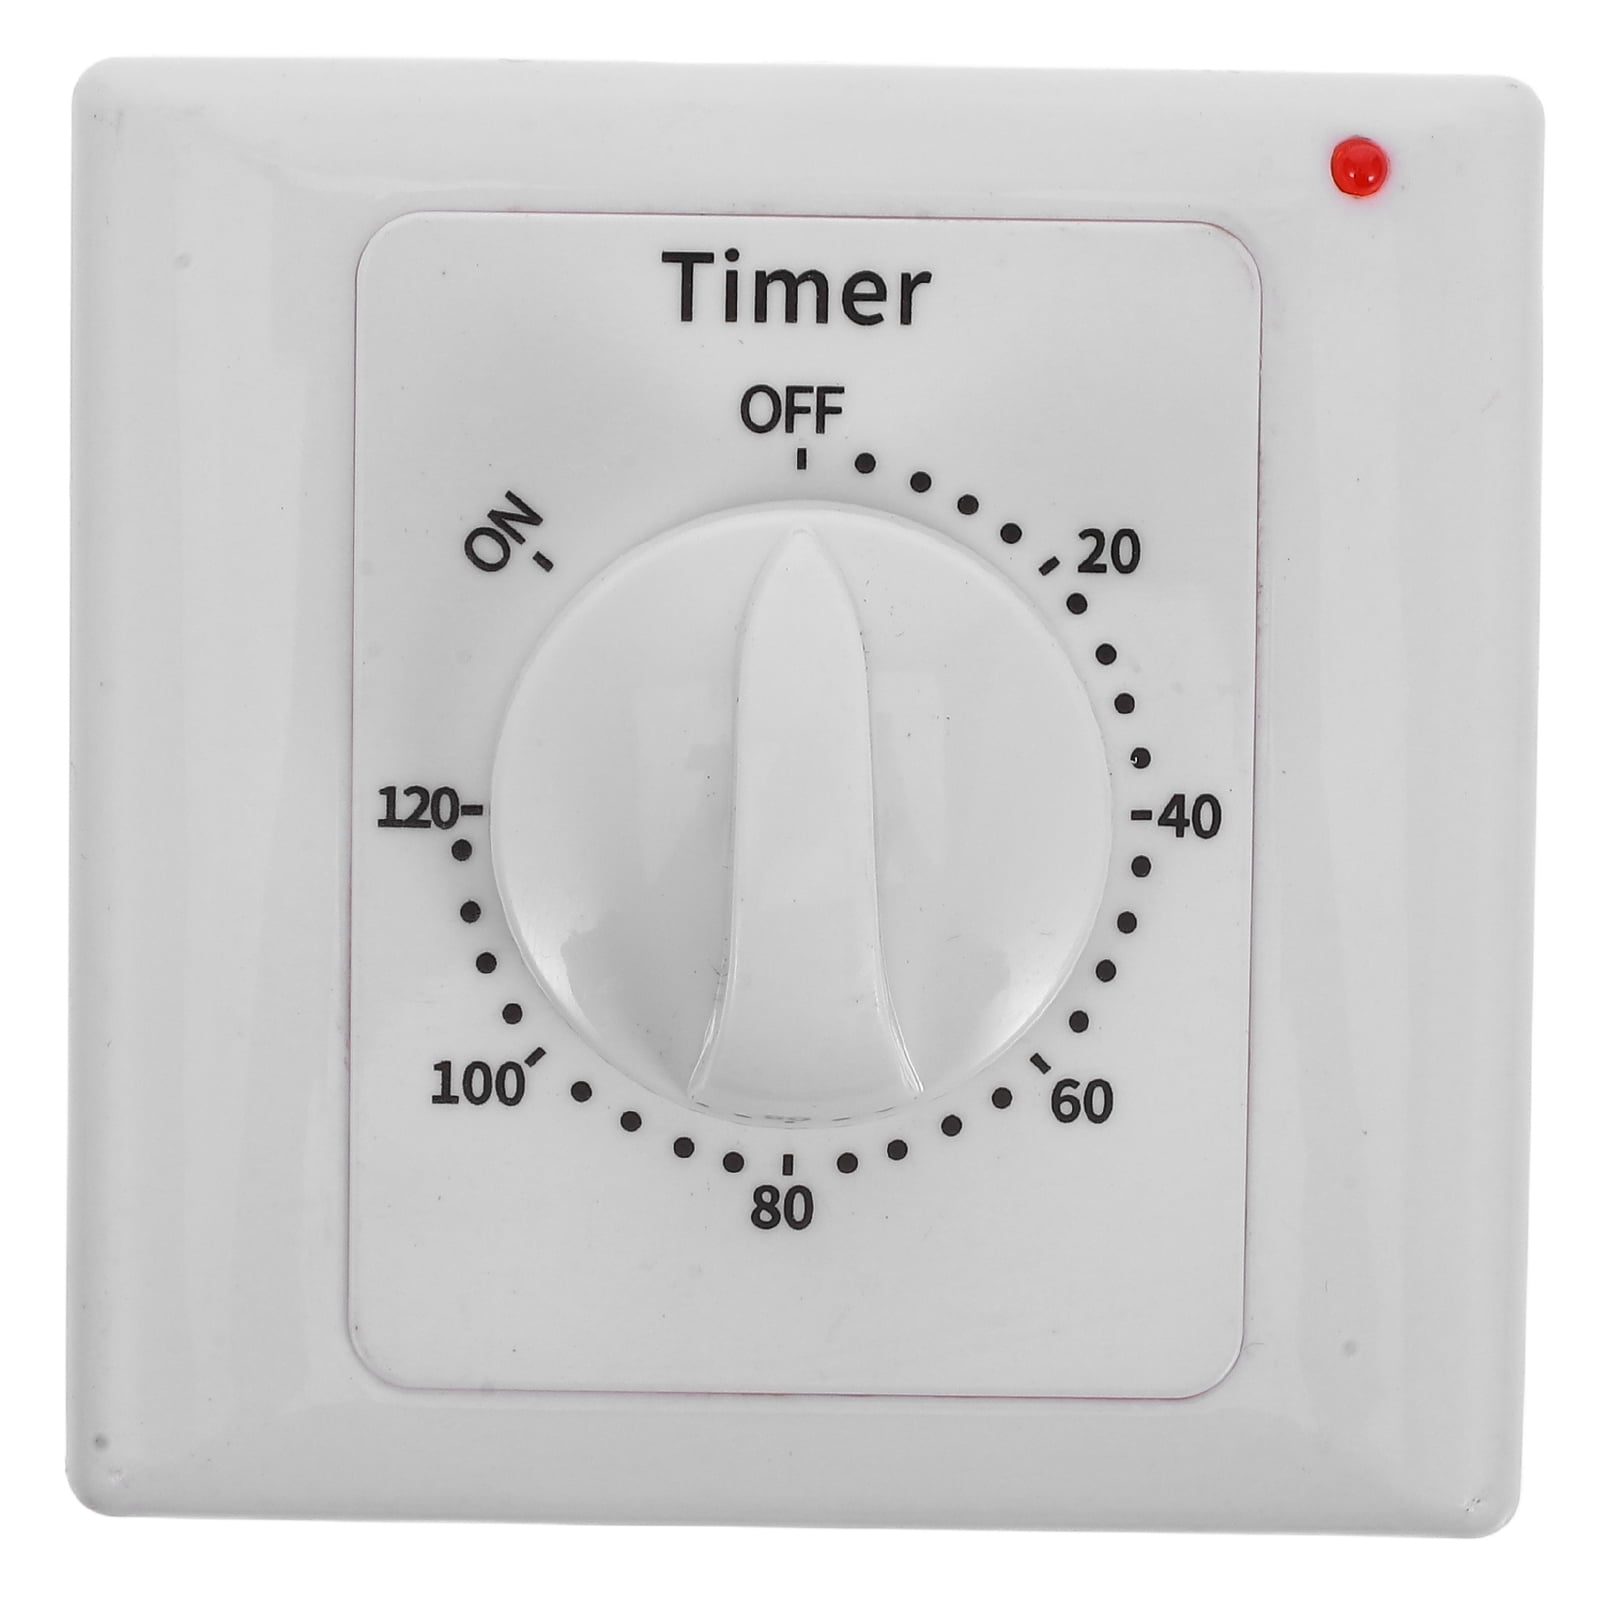
Mechanical Timers: These are often the simplest. They usually have a rotating dial with pins or segments you push in or pull out. Each pin or segment represents a period of time, like 15 or 30 minutes. You put these pins or segments in a particular position to set your on/off times. Our guide on how to make the most of your timer switch notes that some people find mechanical timers a bit confusing to set, but we will make it clear.
Digital Timers: These have a small screen and buttons. They offer more precise control, often down to the minute. You program them using the buttons, selecting days of the week and specific times. They usually have multiple program slots, so you can have different schedules for different days. This type is very common today.
Smart Timers: These are the newest kind. They often connect to your home Wi-Fi and you control them with a smartphone app. Some can even respond to voice commands. They offer the most flexibility, with features like random vacation modes or integration with other smart home devices. For setting these, usually, no special app, smart home device, or smartphone is required for the basic function, but the app does add features.
Why Use a Light Timer Switch?
There are lots of good reasons why people choose to install a light timer switch in their homes. For one, it adds a layer of convenience. You simply set it once, and then you do not have to think about your lights anymore. This means less fuss for you, which is always nice.
Security is another big one. When you are away from home, having lights turn on and off can make it look like someone is there. This can deter unwanted visitors, giving you some peace of mind. It is a pretty effective way to make your home appear occupied, even if it is empty.
Energy saving is also a key benefit. Sometimes, we forget to turn lights off when we leave a room or go to bed. A timer switch ensures lights are not on longer than they need to be. This can help reduce your electricity use, which, you know, is good for your wallet and the environment.
Finally, it is just a nice touch for daily living. Coming home to a lit house on a dark evening, or having your outdoor lights ready for guests, makes life a little smoother. It is a simple upgrade that offers a lot of comfort and practicality.
Getting Ready to Set Your Timer
Before you even begin to set a light timer switch, there are a few important things to think about. Preparation makes the whole process easier and safer. You want to make sure you have everything you need, and that you are working in a safe way.
Safety First
Working with electricity always requires caution. Before you touch any wiring or remove an old switch, you must turn off the power at your home's circuit breaker. This is a very important step. Locate your electrical panel and find the breaker that controls the light switch you are working on. Flip it to the "off" position. Double-check with a non-contact voltage tester to make sure the power is truly off at the switch box. Safety is, you know, paramount.
If you are not comfortable with electrical work, it is always a good idea to get help from someone who knows what they are doing. A certified electrician can install the timer switch for you safely. There are plenty of resources online, too, that talk about basic electrical safety. You can learn more about electrical safety on our site, which is helpful.
Tools You Might Need
You probably have most of these tools lying around your house already. To set a light timer switch, you will typically need a few basic items. A screwdriver set, both Phillips and flathead, will be essential for removing the old switch and installing the new one. Wire strippers might be needed if you have to prepare the wires. Electrical tape is always good to have on hand for insulating connections. A non-contact voltage tester, as mentioned, is really important for safety. You might also want a small flashlight, just in case the area is a bit dim with the power off.
Step-by-Step: How to Set a Light Timer Switch (General Guide)
Once your timer switch is installed, the fun part begins: programming it. The specific steps for how to set a light timer switch will vary a little depending on whether you have a mechanical, digital, or smart timer. However, the general idea of putting a schedule in place is similar across them all.
Mechanical Timer Setup
Setting a mechanical timer, like an indoor 24-hour lamp timer, involves a few simple actions. First, you usually need to set the current time. This is done by rotating the entire dial until the current hour lines up with an arrow or a mark on the timer. It is very much like setting a clock, you know.
Next, you will find small pins or segments around the dial. These are the "elements" of your schedule, a collection of distinct elements, if you will, that define your on and off times. To set the "on" times, you push down or pull out the segments that correspond to when you want the light to be on. For example, if you want the light on from 6 PM to 10 PM, you would push down the segments covering that time span. For the "off" times, you leave the segments up or pushed in. That is how you set the limits.
Some mechanical timers have a manual override switch. This lets you turn the light on or off, regardless of the timer's program, which can be useful. Once you have pushed in the pins for your desired schedule, the timer will begin its work, turning the light on and off as planned. This kind of timer is often loved for its straightforward, no-fuss operation.
Digital Timer Setup
Digital timers offer more precision and flexibility, but they do require a few more button presses to set. Usually, the first thing you do is set the current time and day. There will be buttons like "Clock," "Set," "Hour," "Minute," and "Day" for this. You just press them until the correct time and day show up on the screen. It is pretty much like setting a digital watch.
After that, you will usually press a "Program" or "Prog" button to enter the scheduling mode. The screen will often show "1 ON" or "P1 ON," asking for your first "on" time. You use the "Hour" and "Minute" buttons to select the time, and the "Day" button to select which days of the week this program applies to. You can pick individual days or groups of days, like "Mon-Fri" or "Every Day."
Then, you press "Program" again, and it will ask for "1 OFF" or "P1 OFF." You repeat the process to set the "off" time for that program. Many digital timers allow for multiple "on" and "off" programs, maybe up to 10 or 20. This lets you create a varied schedule. Once you have entered all your desired programs, you usually press a "Run" or "Auto" button to activate the schedule. You might also find a "Random" feature on some models, which varies the on/off times slightly to make it look more natural when you are away. This is a very popular feature for security.
Smart Timer Setup (Briefly)
Smart timer switches are a bit different because they usually involve an app on your smartphone. The first step is typically to install the switch and then download the specific app for your device. You then follow the app's instructions to connect the timer to your home Wi-Fi network. This process usually involves creating an account and pairing the device. It is often quite guided, which is nice.
Once connected, you use the app to set your schedules. This is often very intuitive, with drag-and-drop interfaces or simple menus to pick times and days. Many smart timers let you set up routines based on sunrise/sunset times, your location, or even other smart home devices. You can usually control them remotely from anywhere with an internet connection. Some smart timers can also be controlled with voice assistants like Alexa or Google Assistant. It is a pretty flexible way to manage your lights, and, you know, quite modern.
Tips for Specific Situations
Setting a light timer switch can be adapted for various needs around your home. Thinking about how you will use it can help you get the most out of it. There are a few common scenarios where these timers really shine.
Outdoor Lights
When you are looking to set up a timer switch for outdoor lights, the main thing to remember is to use a timer that is rated for outdoor use. These are built to withstand the elements, like rain and extreme temperatures. Many outdoor timers also have a "dusk-to-dawn" feature, which uses a light sensor to turn lights on when it gets dark and off when it gets light. This is very convenient, as you do not have to adjust the times as the seasons change. Some outdoor timers also come with a ground stake for easy placement in your yard.
You might want your outdoor lights to come on an hour or so before sunset, just as it starts to get dim. Then, you could have them turn off in the middle of the night, perhaps around midnight or 1 AM, to save energy. This approach still provides security during the early evening hours. It is all about finding the right balance for your needs, you know.
Vacation Mode
One of the best uses for a light timer switch is for when you are away from home. Many digital and smart timers have a specific "vacation mode" or "random" setting. If your timer has this, it will turn your lights on and off at slightly varied times each day. This makes it look like someone is actually moving around inside the house, rather than following a predictable schedule. It is a simple trick, but it can be very effective for security.
If your timer does not have a dedicated vacation mode, you can still create a random-like effect. Just set up a few different programs for different lights. For example, have the living room light come on from 7 PM to 10 PM on Monday, but from 6:30 PM to 9:30 PM on Tuesday. Have a bedroom light come on for a short period later in the evening. The goal is to make the lighting pattern less predictable, which is really the point. This kind of setup gives you peace of mind when you are away, knowing your home looks lived in.
Common Questions About Timer Switches
People often have similar questions when they are thinking about how to set a light timer switch or just using them in general. Here are some of the most common ones, with some straightforward answers.
Are light timers easy to set up?
Many light timers are quite simple to set up, especially the mechanical plug-in types. Replacing a regular wall switch with a timer switch can be a bit more involved, as it requires some basic electrical knowledge, but it is still a straightforward project for most DIYers. The programming part, as we have seen, is often just a matter of setting the time and then pushing pins or pressing buttons. So, yes, for the most part, they are designed to be user-friendly.
How do mechanical light timers work?
Mechanical light timers work using a rotating gear system, driven by a small electric motor. As the dial turns, small pins or segments that you have pushed in or pulled out physically engage with a switch mechanism. When a pushed-in pin reaches a certain point, it flips the switch to turn the light on. When it reaches another point where the pin is not engaged, it flips the switch to turn the light off. It is a very direct and simple physical process, which is why they are often so reliable. This simple mechanism is why a mechanical timer is sometimes confusing to set for new users, but once you get the hang of it, it is easy.
Can I put a timer on any light switch?
Generally, you can replace most standard single-pole light switches with a timer switch. However, there are some exceptions. For example, if your light is controlled by two or more switches (a 3-way or 4-way switch setup), you will need a special type of timer switch designed for those configurations. Also, some timer switches have minimum or maximum load requirements, so you need to make sure your lights (especially LED lights) are compatible. It is always a good idea to check the timer's specifications and your home's wiring setup before buying or installing.
Troubleshooting Your Light Timer Switch
Sometimes, even after you think you know how to set a light timer switch, things do not quite work as expected. Do not worry, a lot of common issues have pretty simple fixes. It is often just a matter of checking a few things.
If your light is not coming on at all, the first thing to check is the circuit breaker. It might have tripped, so just flip it off and on again. Also, make sure the light bulb itself is working. Sometimes, it is the simplest thing, you know. Then, check the wiring connections at the switch. Make sure they are secure and correctly matched to the timer's terminals. A loose wire can prevent the light from working.
If the light is not turning on or off at the correct times, go back and review your programming. For mechanical timers, make sure the current time is set correctly on the dial and that the "on" and "off" pins are firmly in their proper positions. For digital timers, double-check all your programmed times and days. It is easy to accidentally set PM instead of AM, or miss a day of the week. Make sure the timer is in "Auto" or "Run" mode, not "Manual" or "Off."
If the timer seems to be losing its settings, especially a digital one, it might be that its internal battery needs to be replaced or recharged. Many digital timers have a small battery that holds the settings during a power outage. Check your timer's manual for instructions on this. You know, these little batteries can make a big difference.
For smart timers, if they are not responding, check your Wi-Fi connection. The timer needs a stable internet connection to communicate with its app. Sometimes, simply restarting your Wi-Fi router can solve connection issues. Also, make sure the app on your phone is up to date. If all else fails, a factory reset of the timer (following its specific instructions) can often clear up glitches. You can find more helpful information on common electrical issues and solutions by looking at resources like NFPA's electrical safety guidelines.
Remember, a timer switch could help you use your appliances without your presence, and you will love this mechanical timer switch or any type you choose. It is about making your home life a little bit easier and more secure. Setting an automatic timer switch for lights is easy, and you really can master the skills of programming your light timer with this guide. So, you know, give it a try!
How To Set Dial Light Switch Timer | Homeminimalisite.com
Hemoton Mechanical Wall Timer Switch for Lights 1 Set Electric Timer

Ultimate Guide to Light Switch Timer Types: Introduction and Purchasing
