Earlobe Stretching Sizes: A Gentle Journey For Your Ears
Exploring the world of earlobe stretching, especially when thinking about different earlobe stretching sizes, can feel like a big step. Many people find themselves drawn to this unique way of changing their appearance, seeing it as a personal expression. It's a process that needs a good deal of care and understanding, and knowing about the sizes involved is really the first thing to get right. This isn't just about putting something through your ear; it's about respecting your body's limits and moving forward in a way that keeps your earlobes healthy.
Your earlobes are quite special, you know, very different from the rest of your outer ear. My text tells us that the human earlobe, which is the lower part, is made up of tough areolar and adipose connective tissues. It doesn't have that firm, springy feel that the rest of the ear has because it lacks cartilage. This unique makeup means they can be stretched, but it also means they need a gentle touch and plenty of time to adapt.
So, as we talk about earlobe stretching sizes, remember that patience is a truly valuable thing. It's about listening to your body, giving it the time it needs to adjust to each new step, and making sure you're doing things in a way that supports the health of your earlobes. We'll explore the common sizes, how to move between them, and what to keep in mind for a good experience.
Table of Contents
- Understanding Your Earlobe: The Canvas for Stretching
- Getting Started: Your First Steps in Earlobe Stretching Sizes
- The Stretching Journey: A Guide Through Earlobe Stretching Sizes
- Caring for Your Stretched Lobes: Aftercare and Maintenance
- When to Stop: Understanding Your Earlobe's Limits
- Frequently Asked Questions About Earlobe Stretching Sizes
Understanding Your Earlobe: The Canvas for Stretching
Before you even think about earlobe stretching sizes, it's pretty important to get a sense of what your earlobe actually is. My text points out that the earlobe is the soft, round part at the bottom of your ear. It's quite different from the rest of the outer ear, which has cartilage, so it's a unique part of your body to work with, in a way.
What Makes Your Earlobe Unique?
As my text explains, your earlobe is mostly made of connective tissues, like areolar tissues and fat cells. This mix gives it a good deal of flexibility but also means it doesn't have the firmness of cartilage. This is why it can stretch, which is actually pretty cool. It also has a good supply of blood, which helps keep it warm and, importantly, helps it heal and adapt when you're stretching it.
The absence of cartilage is a very big deal for stretching, you know. It means the tissue can give way and expand without breaking or causing too much trouble, provided you go slow. This is quite unlike trying to stretch other parts of your ear, which would be very painful and possibly damaging. So, the earlobe is uniquely suited for this kind of body change, basically.
Why Earlobe Stretching is Different
Stretching your earlobes isn't like getting a regular piercing; it's a gradual process of enlarging an existing hole. Because your earlobe is so soft and has no cartilage, it responds well to gentle, slow pressure. This means you can't just jump to a large earlobe stretching size right away. You have to allow the tissue time to loosen and grow, which is a rather important distinction.
The process depends a lot on the earlobe's natural ability to expand. My text even mentions safe methods for earlobe stretching, which really highlights that there's a right way to do it. It's not about forcing anything; it's about encouraging your body to make space, you know. This gentle approach helps prevent tears and other issues that can happen if you rush things.
Getting Started: Your First Steps in Earlobe Stretching Sizes
Starting your earlobe stretching journey is exciting, but it's also where careful planning really matters. Picking the right initial earlobe stretching sizes and tools sets the stage for a smooth experience. You want to make sure you're giving your ears the best possible start, you know, without any undue stress.
Choosing Your Starting Size
For most people, the journey into earlobe stretching sizes begins with a standard ear piercing, which is usually around 20 gauge (G) or 18G. From there, the smallest recommended stretching size is typically 16G or 14G. Starting small is very important, as it minimizes the risk of harm to your earlobe tissue. It's like taking tiny steps rather than a big leap, which is usually safer.
Some people even suggest starting with a 14G if your initial piercing is well-healed and feels roomy enough. However, if you're unsure, going with 16G is a generally safe bet. The key is to never skip sizes, especially at the beginning. Each step up, no matter how small, is a chance for your earlobe to adjust and get ready for the next one, apparently.
The Right Tools for the Job
When it comes to stretching, having the correct tools is pretty much everything. Tapers are often used for stretching; these are cone-shaped tools that gradually increase in size, allowing you to gently push them through your earlobe. You'll also need plugs or tunnels to wear immediately after stretching to keep the new size. Material matters, too; surgical steel, glass, or titanium are usually good choices for fresh stretches because they are less likely to cause irritation, you know.
It's also a good idea to have some kind of lubricant, like jojoba oil or vitamin E oil, to help the taper slide through smoothly. Never use harsh chemicals or anything that might dry out your skin. The goal is to make the process as easy and gentle as possible for your earlobe. Using the wrong tools or materials can cause real problems, like tears or infections, so be very careful.
The Stretching Journey: A Guide Through Earlobe Stretching Sizes
The path through different earlobe stretching sizes is a marathon, not a sprint. Patience is truly your best friend here. Rushing things is one of the biggest mistakes people make, and it can lead to some really unpleasant issues. So, take your time, and your ears will thank you, basically.
Gradual Steps: Why Patience is Key
The general rule of thumb is to wait at least a month, and often much longer, between each earlobe stretching size. For smaller sizes, like from 16G to 14G or 14G to 12G, a month might be enough. But as you get to bigger sizes, say from 8G to 6G or 2G to 0G, you might need to wait two, three, or even four months. Some people even wait half a year or more for the really big jumps, you know.
This waiting period allows your earlobe tissue to heal fully, gain elasticity, and grow new cells. If you stretch too soon, you risk blowouts (where the inside of your earlobe pushes out the back), tears, or severe thinning of the tissue. These issues can make it very hard to continue stretching or even keep your current size. So, truly, slow and steady wins the race.
Common Earlobe Stretching Sizes and What to Expect
Earlobe stretching sizes are usually measured in gauges (G) for smaller sizes and millimeters (mm) for larger ones. Here's a general idea of the progression:
- 20G (0.8mm) to 14G (1.6mm): These are your starting points. The jumps are very small, and you might feel a slight pressure or warmth.
- 12G (2mm) to 8G (3.2mm): These are still relatively small, but you'll start to notice the hole getting bigger. The stretches might feel a bit more noticeable.
- 6G (4mm) to 2G (6mm): This is where many people start to feel like their ears are truly stretched. You might need more time between sizes here.
- 0G (8mm) to 00G (10mm): These are quite common goals for many. The waiting time between these sizes becomes even more important.
- Beyond 00G (10mm+): Once you pass 00G, sizes are almost always measured in millimeters. The jumps become bigger in terms of actual tissue displacement, so patience is absolutely crucial. For example, going from 10mm to 12mm is a 2mm jump, which is like skipping several gauge sizes in the smaller range.
Each person's body is different, so your experience with earlobe stretching sizes might vary. Some people's ears stretch more easily than others, which is just how it is. Just remember to respect your own body's pace, you know.
Recognizing Your Body's Signals
Your earlobes will tell you if you're pushing too hard. A little bit of pressure or a slight stinging sensation during the stretch is somewhat normal. However, if you feel sharp pain, see significant redness, swelling, or bleeding, you've gone too far. This is your earlobe basically saying "stop!" If this happens, you should remove the new jewelry, clean your ear, and let it shrink back down a size or two before trying again much later, you know.
Ignoring these signals can lead to permanent damage, like scar tissue, which makes future stretching much harder or even impossible. It's a bit like trying to force a key into a lock that's too small; you'll just break the lock. So, pay close attention to what your body is telling you throughout your journey with earlobe stretching sizes.
Caring for Your Stretched Lobes: Aftercare and Maintenance
Proper care is just as important as choosing the right earlobe stretching sizes. Keeping your stretched lobes clean and healthy prevents issues and helps them adapt to their new dimensions. My text talks about proper care techniques, and they really are essential for a good outcome.
Daily Cleaning Rituals
Once you've stretched to a new earlobe stretching size, you'll want to clean your lobes and jewelry daily. A simple saline solution or a mild, unscented soap is usually best. Gently wash around the jewelry and the earlobe itself, making sure to remove any buildup of dead skin cells or discharge. Then, rinse thoroughly with warm water and pat dry with a clean paper towel. It's a pretty straightforward routine, but it makes a big difference, you know.
Some people also like to do oil massages with jojoba oil or vitamin E oil after cleaning. This helps keep the tissue supple and healthy, which is very good for elasticity. Just be sure your hands are clean before you touch your ears. Consistency in cleaning is very important, especially in the first few weeks after a stretch.
Keeping Your Lobes Healthy and Happy
Beyond daily cleaning, there are other ways to support your earlobes. Avoid sleeping directly on your fresh stretches, as this can put pressure on them and slow down the healing process. Using a travel pillow or sleeping on your back might help. Also, be mindful of clothing, hair, and anything else that might snag your jewelry, which can be quite painful and set back your progress.
Staying hydrated and eating well also supports overall skin health, which, in turn, helps your earlobes. Think of it as nurturing the canvas you're working with. A healthy body generally heals better and adapts more easily to changes, you know. So, your general well-being plays a part in your earlobe stretching journey.
Dealing with Common Issues
Even with the best care, sometimes issues can pop up. My text mentions common issues, and a swollen earlobe is one that can happen. If you notice swelling, pain, redness, or discharge that suggests an infection, it's really important to address it quickly. Sometimes, a gentle salt water soak can help, but if symptoms persist or worsen, you should see a doctor. My text advises when to see a doctor, and for persistent infection signs, that's definitely the time, you know.
Blowouts, as mentioned earlier, happen when you stretch too fast. If you experience one, downsize immediately and let your earlobe heal completely before attempting to stretch again. It's a setback, but it's better than permanent damage. Remember, your earlobe's health is the most important thing, more so than reaching a specific earlobe stretching size quickly.
When to Stop: Understanding Your Earlobe's Limits
Knowing when to stop or when you've reached your personal limit for earlobe stretching sizes is a very important part of the journey. Not all earlobes can reach every size, and that's perfectly okay. It's about finding what feels right for your body and what looks good to you, you know.
The Point of No Return
While earlobes are quite flexible, there's a point where the stretching becomes permanent. Generally, earlobes stretched up to 00G (10mm) or sometimes even 12mm have a good chance of shrinking back to a nearly normal piercing size if you decide to remove your jewelry for good. However, once you go much larger than that, the likelihood of your earlobes fully closing up decreases significantly. This is a big decision, so consider it carefully before aiming for very large earlobe stretching sizes, you know.
The amount of elasticity in your earlobe also plays a role. Some people naturally have more stretchy lobes than others. If your lobes feel thin or look unhealthy at a certain size, it might be a sign that you've reached your personal limit. It's better to maintain a healthy, slightly smaller size than to push for a larger one that compromises your earlobe's integrity.
Listening to Your Body
Ultimately, your body will tell you what it can handle. If a stretch feels too painful, or if your earlobes consistently feel tender, thin, or show signs of distress, it's a very clear message to slow down or even stop. There's no shame in staying at a smaller earlobe stretching size if that's what your body prefers. It's your journey, and your health comes first, basically.
Remember, the goal is to have healthy, happy earlobes, no matter their size. This means prioritizing their well-being over reaching a specific number on the gauge chart. If you're ever unsure or have concerns, it's always a good idea to chat with a professional piercer or a doctor. Learn more about earlobe care on our site, and for more details about proper stretching techniques, you can also link to this page. You might also find helpful information about general body modification safety from reliable sources like the Association of Professional Piercers.
Frequently Asked Questions About Earlobe Stretching Sizes
Here are some common questions people ask about earlobe stretching sizes:
What is the best size to start ear stretching?
Most people start their earlobe stretching journey at 16 gauge (1.2mm) or 14 gauge (1.6mm), assuming their initial piercing is well-healed. It's very important to begin with a small step to allow your earlobe tissue to gently adapt. Going too big too soon can cause damage, you know.
How long does it take to stretch ears?
The time it takes to stretch ears varies a lot from person to person, but patience is truly key. A general rule is to wait at least one month between smaller earlobe stretching sizes, and two to four months or even longer for larger jumps. Rushing the process can lead to issues like blowouts or tears, which then take even longer to heal, basically.
Can earlobes heal after stretching?
Yes, earlobes can often heal and shrink back to a smaller size, or even close up completely, especially if they haven't been stretched too large. Generally, sizes up to 00 gauge (10mm) or 12mm have a good chance of shrinking back significantly. However, once you go beyond that, the changes are often more permanent. It really depends on your individual earlobe's elasticity and how well you cared for them during the stretching process, you know.

Before & After Photos Earlobe Repair 3 | NYC
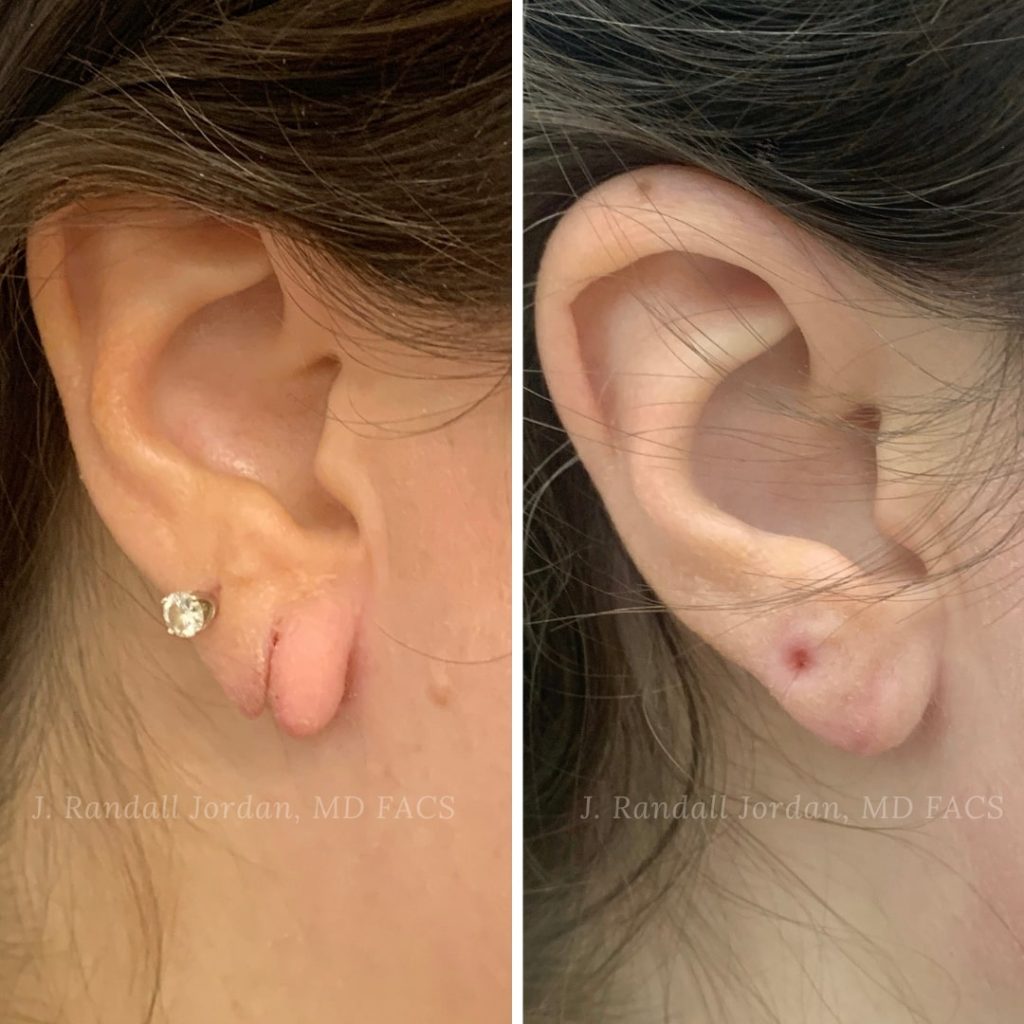
Ridgeland Earlobe Repair | Jackson, MS Faces PLLC
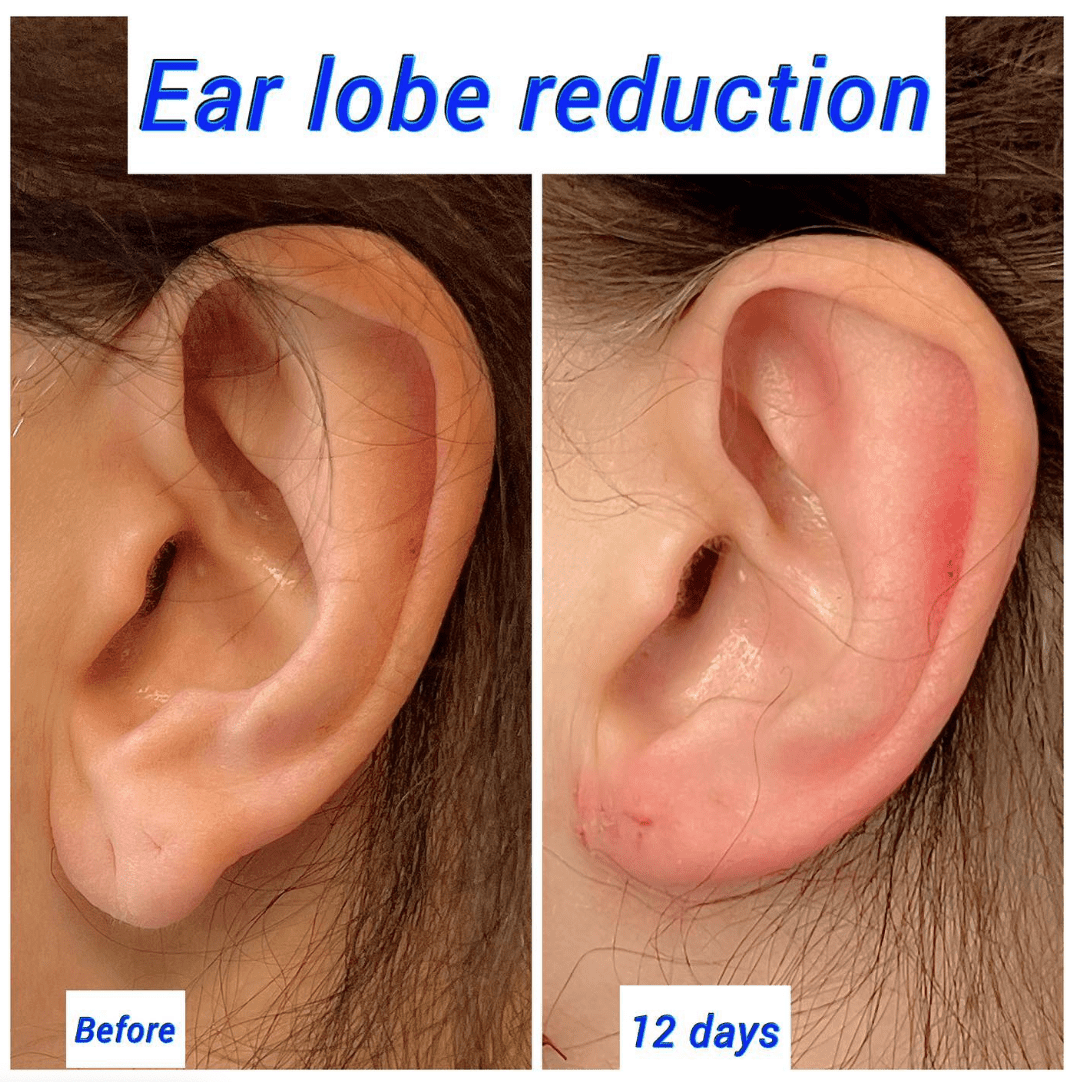
Earlobe Reduction Surgery | Ear Surgery - Harley Clinic
